You are using an out of date browser. It may not display this or other websites correctly.
You should upgrade or use an alternative browser.
You should upgrade or use an alternative browser.
nomad mods
- Thread starter nomad100hd
- Start date

Help Support The Boogie Board:
This site may earn a commission from merchant affiliate
links, including eBay, Amazon, and others.
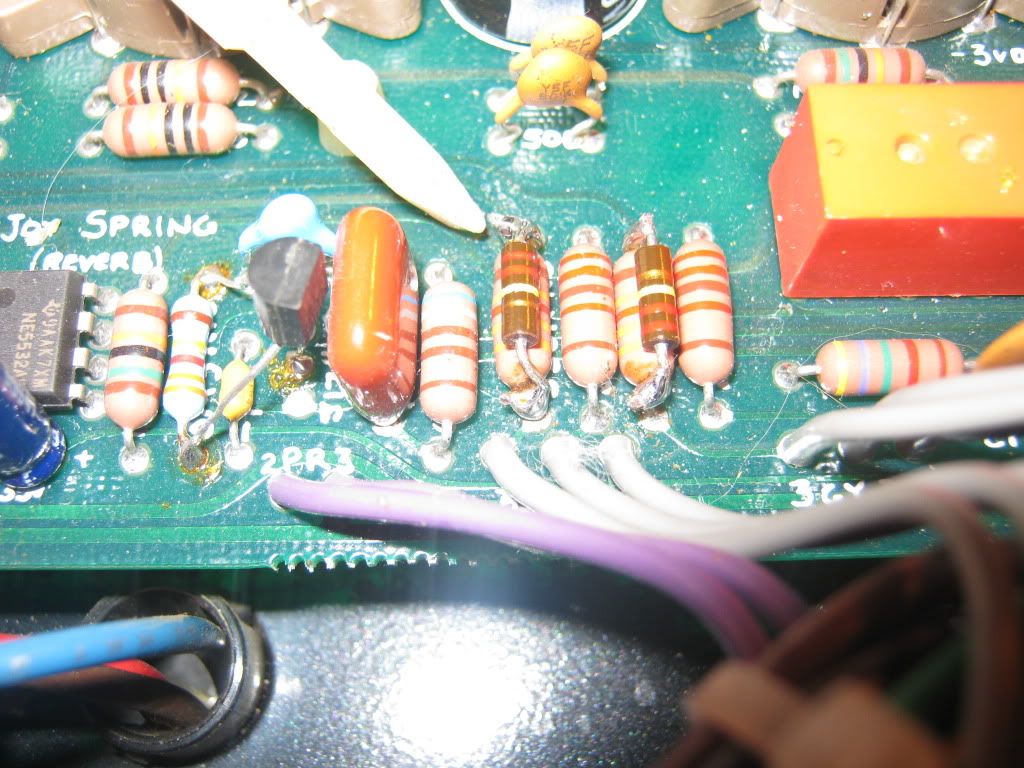
EFX return capacitor: Trace the wiring that feeds the OUTPUT control back to the board. Follow the traces to a 500 pF (.005 mfd) capacitor. Replace with a lower value. An earlier poster suggested 47 pF, which is what I used. This should stop RF without bleeding audible treble. The capacitor is located between a 56 k and 100 k resistor. You can also find this by following the traces from V4B pin 6 through a .047 coupling capacitor. The capacitor is located on the upper left edge of the board (viewed facing the rear of the amp), near the OUTPUT and SOLO controls.
You will have to reduce the Presence a little to compensate for the added brightness of this mod.
You will have to reduce the Presence a little to compensate for the added brightness of this mod.
thelastleroy
Well-known member
- Joined
- Mar 26, 2009
- Messages
- 46
- Reaction score
- 0
I think I found the 500pf cap you're talking about, is it this one??


500 pF capacitor: I can't confirm 100 percent -- I'm traveling and I don't have my photos of the amp innards here, but this looks like the one. You should confirm by comparing to the schematic. Do you have a DVM / continuity tester? You can follow the traces and confirm connections when in doubt with the meter. Just remove and replace with a lower value carefully so as not to mess up the PCB traces.
thelastleroy
Well-known member
- Joined
- Mar 26, 2009
- Messages
- 46
- Reaction score
- 0
Thanks for trying to get me through this, still fairly new at the electronics thing.
Yeah, I have a DVM at work I'll bring it home. I guess in the interest of saving the board the easiest way to get in and out quickly with the iron is to cut the cap out close to the top and individually heat/pull out the leads with pliers to keep heat to a minimum?? Then trim, place and solder the new cap into the holes? I've never done surgery on an amp PCB before. What ratings should the new 47pf cap have (Ie Voltage and wattage?) Does orientation (+/-) of the leads matter on a capacitor of this type?
Pat the Cat
Hello Pat
You should use a soldering iron with a pointy tip so you can direct the heat precisely.
If you have a pair of pointy-nosed needle-nose pliers, you can probably heat one pin at a time and just gently rock the capacitor and ease the pin out. Repeat for the other pin. This way you may be able to re-use the capacitor.
Bend the leads of the new 47 pF capacitor to have about the same shape and length as the original (before you yanked it). Heat the pads one at a time and ease the new capacitor in, don't force it or the leads will bend, and you could damage the circuit board trace. If you have a solder sucker, you can suck old solder out of the hole first. I didn't need to use a solder sucker when I did this mod.
Just about any silver mica 47 pF capacitor will handle enough voltage -- most are rated at a couple hundred volts or more. The EFX loop will only subject the capacitor to a couple of AC volts and no DC judging from the schematic. Silver micas do not have a polarity.
Be careful you don't touch the side of the soldering iron to any wires or connectors and melt them. If your hand isn't too steady or the space is too tight, you can use masking tape or paper to temporarily protect the innards of the amp near the soldering iron.
thelastleroy
Well-known member
- Joined
- Mar 26, 2009
- Messages
- 46
- Reaction score
- 0
Tejas said:Hey there fellows,
I'm new here, but I did these mods and a couple of others and I thought you might like to hear my results.
Mud mod ----- Works great I love it. I also noticed that after doing this mod and running the amp thru a Jensen cab, there was no mud at all and the amp is plenty bright.
Series FX loop ------- This one was perfect for me for a couple of reasons, 1. I don't use the loop much, but when I do it is for delay and it works better as a series loop. and 2. I removed the pot for the FX loop and used the hole for a trim pot for the adjustable bias mod.
Bias mod ------- I took out the 15k bias resistor and replaced it with a 10k pot in series with a 10k resistor. I mounted the pot in the hole where the fx loop pot was. 10k minimum with another 10k adjustable seems to be spot on for several sets of tubes I have tried.
Here's is a mod that I came up with myself that I think was highly successful.
- I think the stock reverb circuit is garbage, so I fixed it.
The signal flow into the reverb driver is bottle-necked thru a 500pf cap and a 475K resistor.
The 500pf cap is only passing the most annoying high pitched frequencies into the driver to be
reverberated. I replaced it with a .02 Orange drop.
Next the 475K resistor is choking off quite a bit if signal and leaves the reverb pretty weak. I paralleled a 330k accross the existing resistor. That lets a bit more signal come thru and gives more reverb.
Coming out of the reverb recovery stage right before mixing back in with the dry signal, the signal is again cut off at the knees by a .005 cap. I replaced that with another .02 orange drop.
Result: good usable reverb that sounds lush and has no more ice pick feel.
Hope this is useful to someone.
Dave
Hey everyone, I was hoping someone can help me with this reverb mod. Is a .02 Orange drop capacitor .02uF? What voltage rating for the 330k resistor? I'm guessing 1/4 watt will work?
Hello, new nomad 55 owner.
Tried the snubbing cap and FX loop mud mod changes, much improved amp, everyone should do this in my opinion.
Also tried the suggested mod of lowering the series resistance on the input to the reverb. Not sure I like this, the volume on the reverb has gone up a lot (good), but I think the reverb itself seems to sound pushed to hard. The original value is 475K and I lowered it to 220K. I am thinking about trying a compromise, maybe in the 300K range for a modest increase in reverb volume and hopefully a good reverb tone.
One other change I made is that I raised the cathode bypass cap values on both V1 and V2a. Piggy-backed 4.4uF caps. Big improvement for me. The clean is much better with added bass response, and I now like channel 3. I did not touch any bypass caps on the subequent gain stages for channel 2 and 3. Changing V1 was enough for those channels and I would suspect the reduction in bass gain through those stages is needed.
My reasoning is that most amps people seem to love use higher values for good clean tone: 22uF on fenders, 3.3uF on F series, 15uf on Lonestars, and switchable 15uF on some Mark series.
I think the cathode bypass caps are an area for experimentation and good tone improvement. Two words of caution, I did the mud mod so the added bass may be a disaster without first getting the added clarity. Second, I am not a high gain player, I run channel 2 and 3 gain in the 10-2 neighborhood.
thelastleroy
Well-known member
- Joined
- Mar 26, 2009
- Messages
- 46
- Reaction score
- 0
@CJ Nomad
Welcome to the Nomad club. I also recently performed the reverb mod, and found that especially on channel one the reverb circuit becomes over-driven with even modest settings. Let me know if the 300k resistance clears this up, I will swap out that resistor.
If you have the time, I would really appreciate some guidance on the cathode bypass cap mod you speak of. What type of caps did you use? voltage ratings? would you be able to identify the locations on a picture of the board?
Hello fellow brave Nomad owners. Not seeing a bias mod here and seeing some requests I'll post my best guess. Now, the mod I did was not for the faint at heart because I drilled some holes in the chassis. You can accomplish the same thing w/o destruction with some thought. I did this for three reasons: (1) I bought a matched quad of 6L6's off my friend who owns a music store, in lieu of Dougs Tubes, The Tube Store, Eurotubes or Mesa, and, of course, they ended up colder than a gold diggers *** in the Klondikes - like nearly half power. (2) I gig frequently, I carry spare tubes and parts, and I needed a way to change tubes on the fly without tearing my amp apart. (3) With all the Nomad bashing and seeing the resale value of Nomads go for 50% of the original retail price, I'm relatively sure I'm not screwing up a future collectors item. I have a Nomad 100 2x12 combo which is a real ball buster and a PITA to work on.
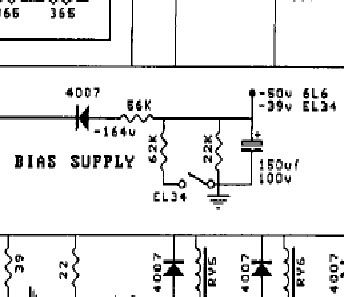
Bias section before mod:
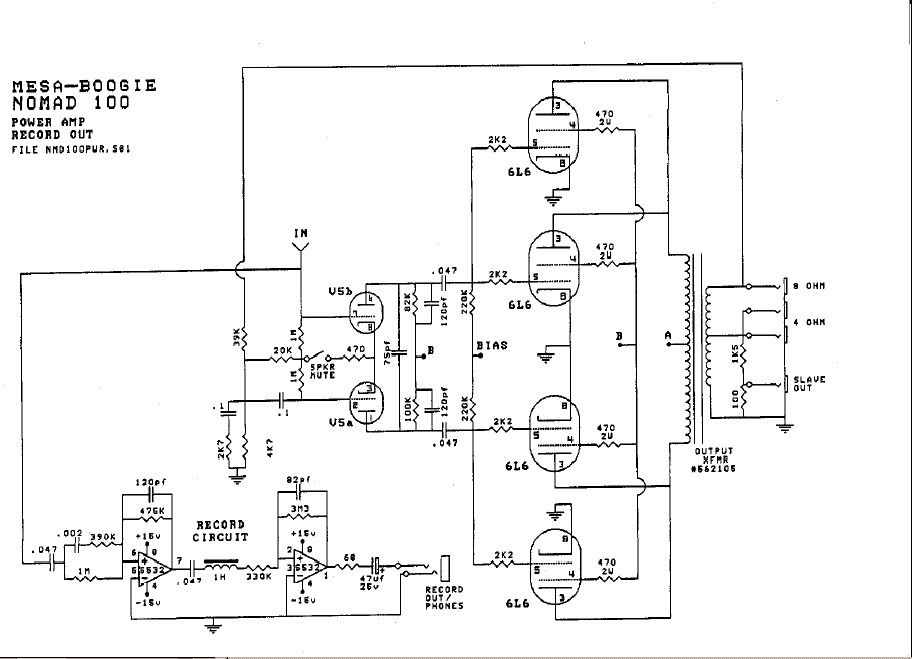
Power section before mod:
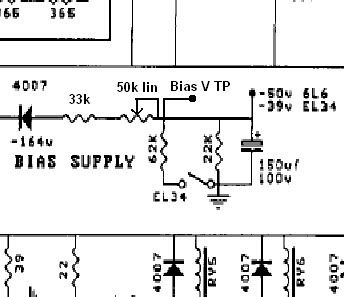
Bias section after mod:
Power section after mod:
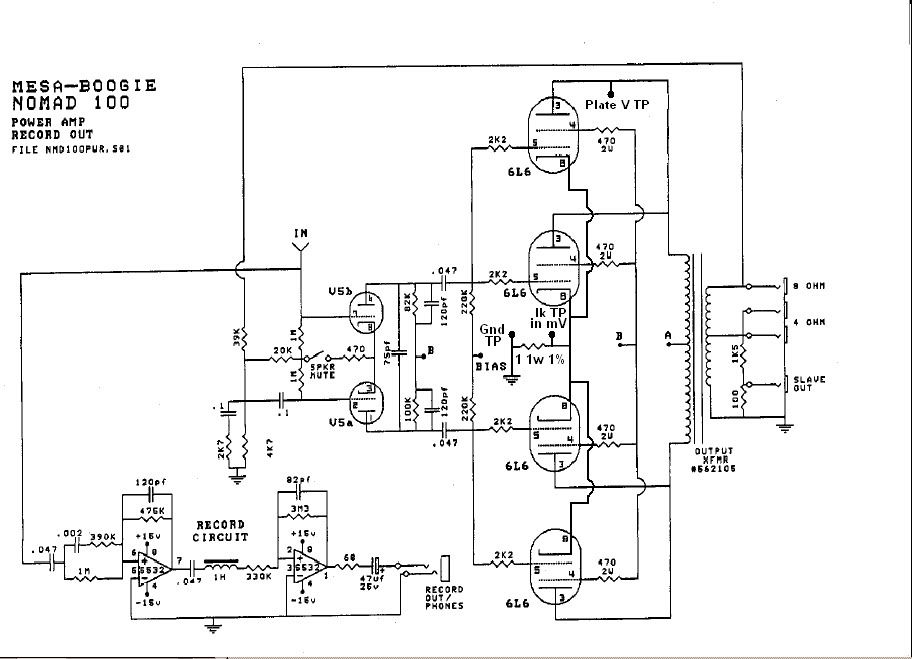
What I was going for was a way to adjust the bias without removing the feature of being able to switch between 6L6 or EL34 and this is why I selected to remove the 56K resistor and replace it with a 33k safety resistor and a 50K pot. Some quick calulations told me this would meet the sweet spot of most output tubes. The 1 ohm, 1 watt, 1% resistor installed between the 6L6 cathodes and ground is a way for me to measure the amount of cathode current flowing though all four tubes. I just plug my voltmeter across the resistor and mV = mA. This is the same priciple many bias probes use except they usually measure one tube at a time. I was thinking about using a 1 ohm. 2W, 5% resistor for a safety factor, but, after testing, the max dissapation of the resistor will never get above .5 watts and I like the presision of 1%. I mean, if the resistor does burn at 1 watt, which would mean the amp would be trying to pump out 400+ watts, I hope it would burn up and save my output transformer!
Now some pictures:
56K resistor removed and the 33k safety resistor installed and shink wrapped:
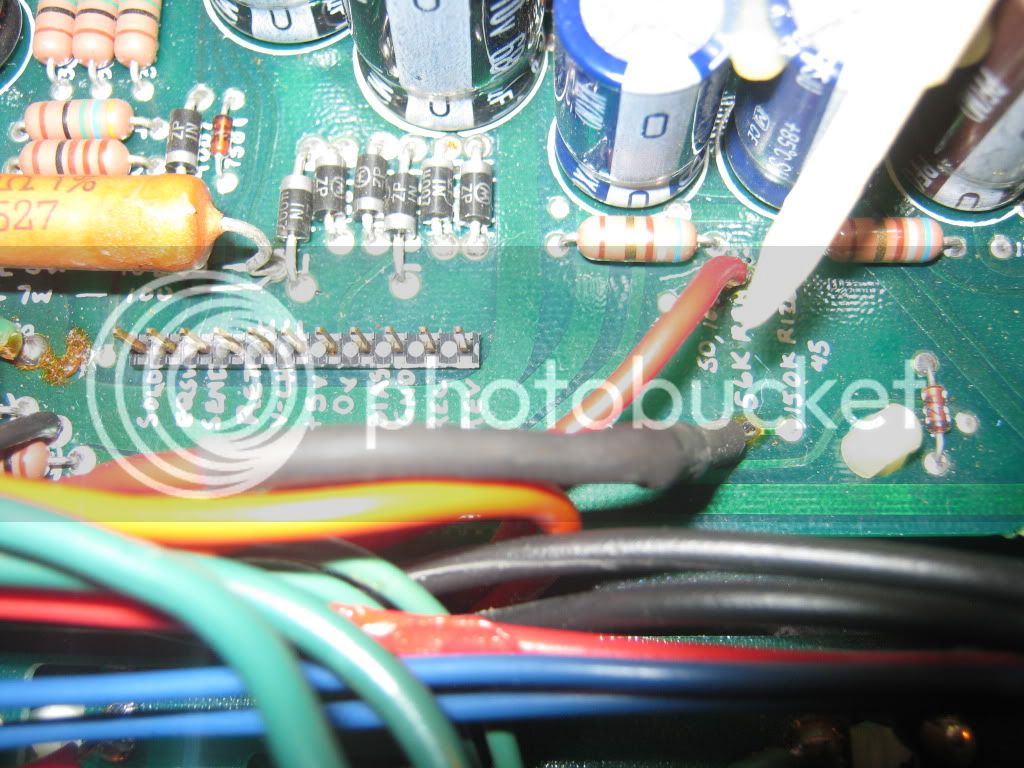
Purple ground jumper removed and the black jumpers installed to the 1 ohm resistor:
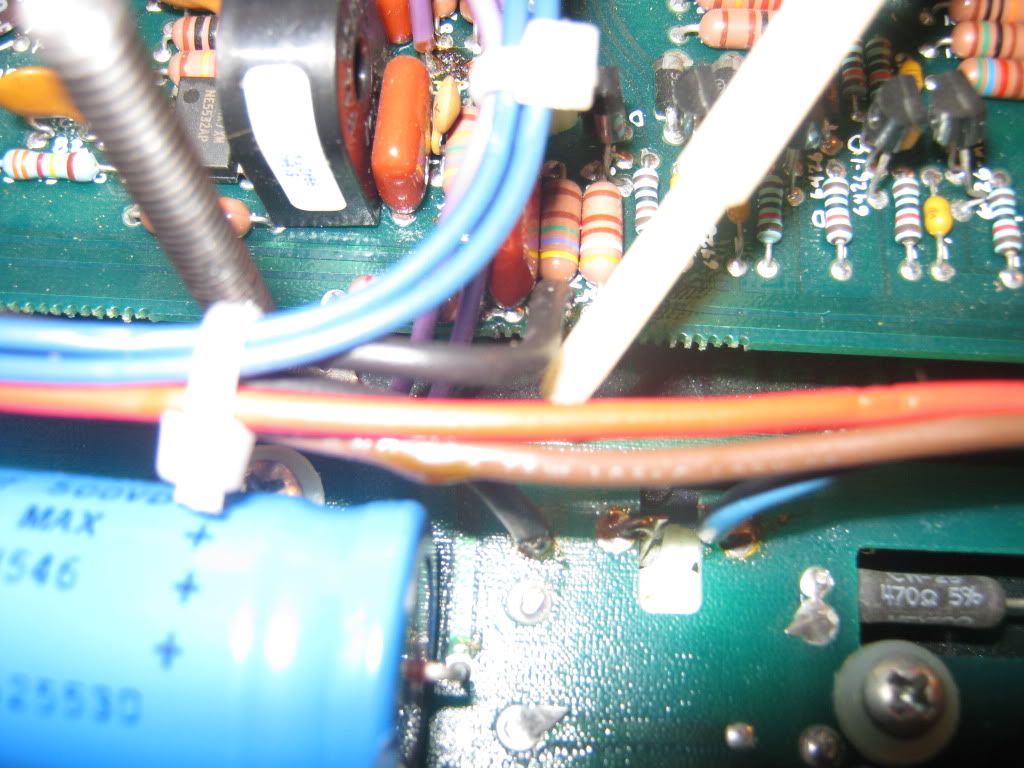
Internal shot of the bias pot and test points:
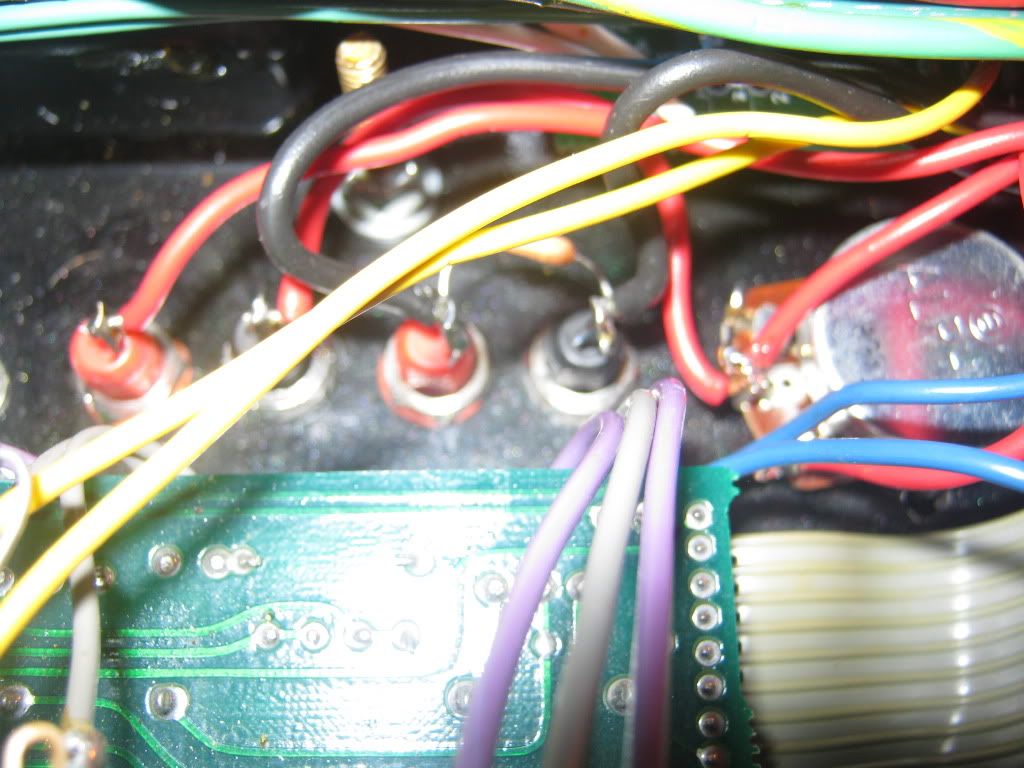
Internal close-up of the bias pot and 1 ohm resistor. Notice how I jumpered the wiper of the pot to the unused pole. I did this in case the wiper fails and tries to nuke the amp. The pot is wired so that fully CCW that cathode current is at minimum and fully CW the cathode current is maximum:
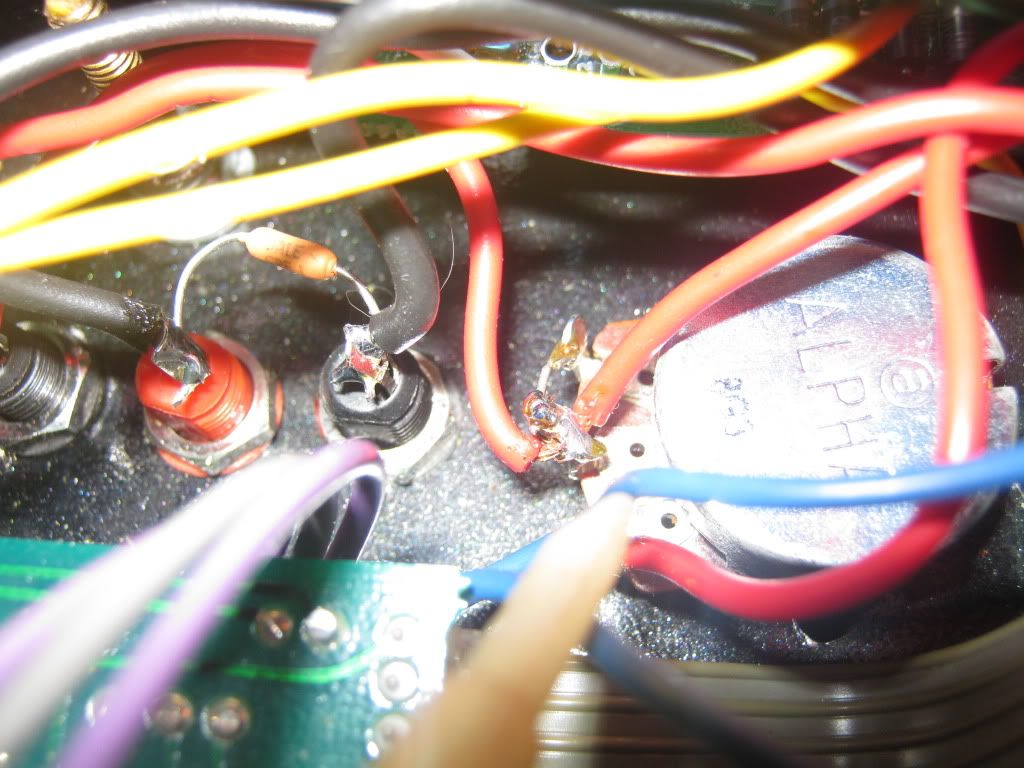
External bias pot and test points. I know a military grade locking pot would be better, but, I did saw off the shaft to keep it from getting bumped:
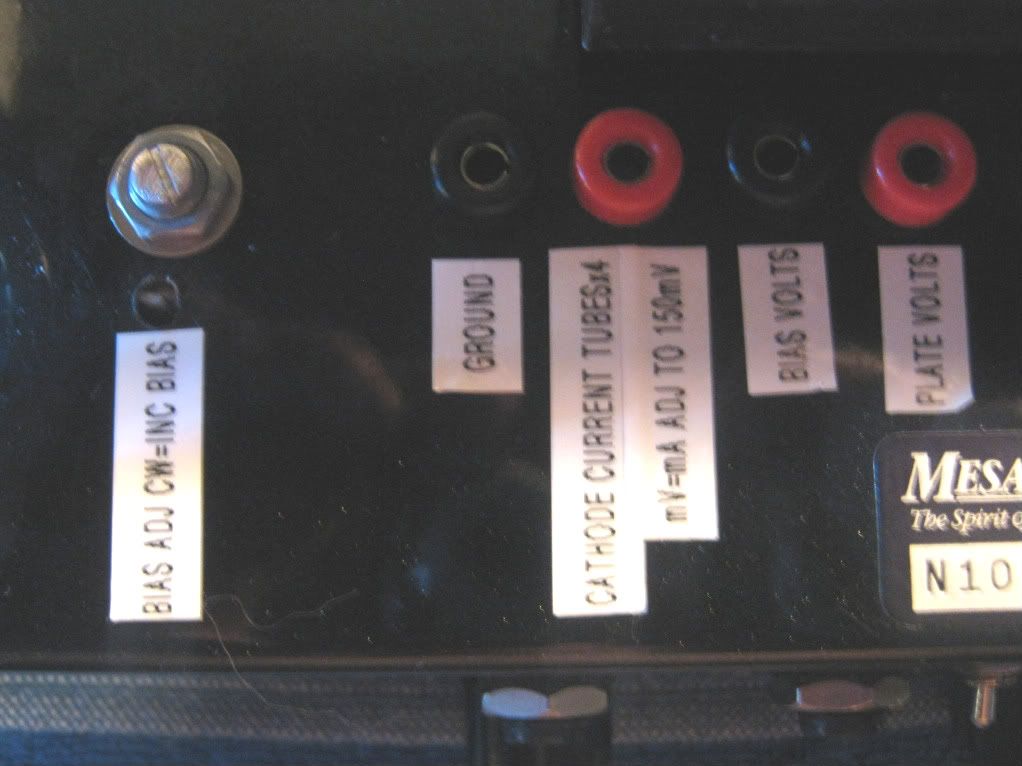
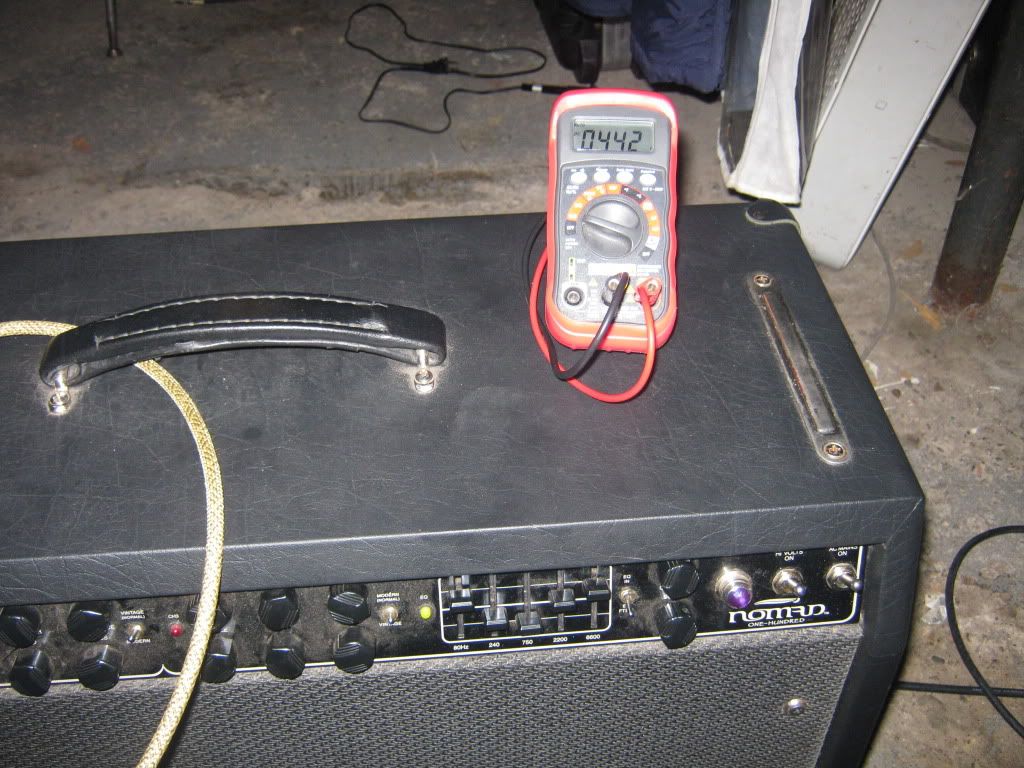
Plate voltage = 442V:
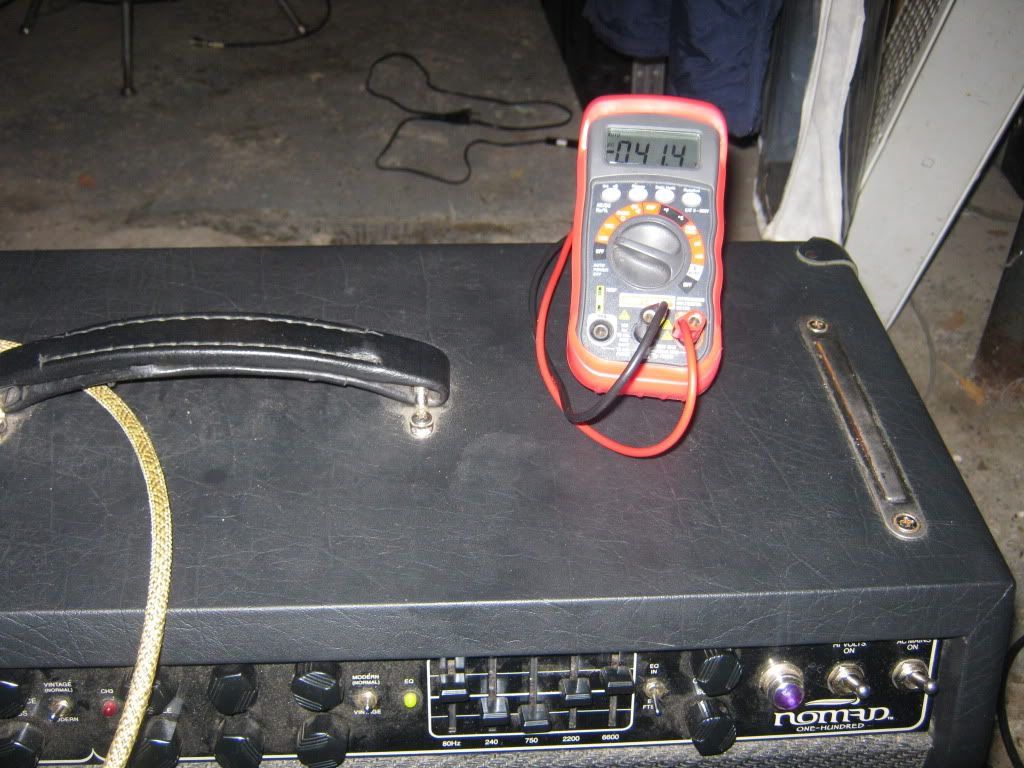
Bias voltage = -41.4V. Quite a difference from the fixed -50V:
Cathode current x4 6L6 = 150.5mA (shown in mV):
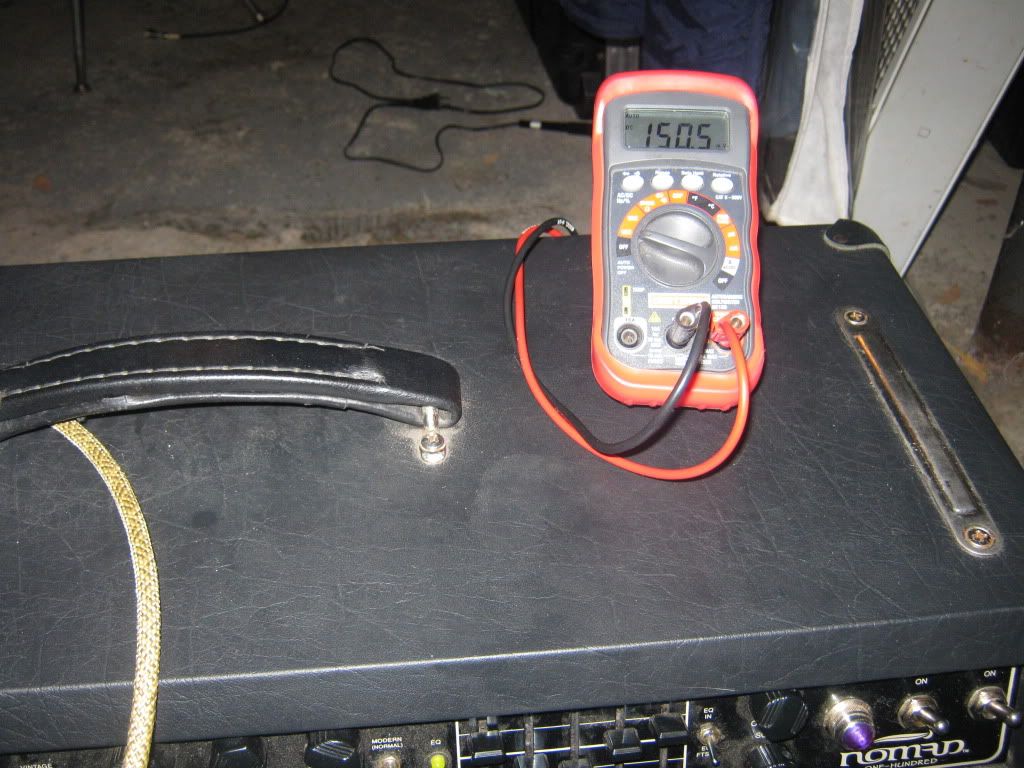
OK. Some calculations: P idle = 442V x 150.5mA = 66.5 watts. I'm in the ballpark - could be a little hotter. You would like to get to 70% plate dissapation for class AB push-pull.
The cool thing here is I can replace my output tubes and bias the amp, with a voltmeter and a screw driver, without even taking the back cover off.
Now - I seen some late discussion on reverb mods. The most chatter I've heard is that the reverb is heard on channel one but is nearly non existant on channels two and three and I agree with this complaint. I could see if you start tinkering around with the 475k resistor or the 500pF cap could cause distortion while using channel one with reverb. I may try to raise the cap's value later. The next logical choice would be to bump up the signal coming back out of the reverb. I can't take credit for this mod as I have seen it here before, but sadly, the link has been removed so I'm posting my version of it here. Disclaimer - you will probably never get the reverb from your Nomad to sound like a Fender Twin without serious $ and time.
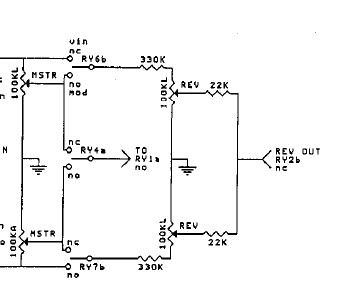
Reverb circuit before mod:
Reverb circuit after mod:
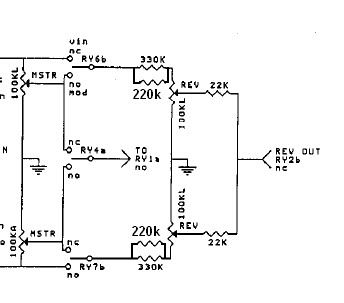
The two 330K resistor are throttling the signal back into the mix so I paralleled two 220K resistors across them lowering the resistance to 130K. The result was that the reverb was just as present in channels two and three as channel one.
Reverb picture before mod. The two 330K resistors are near the gray leads coming from the reverb pots:
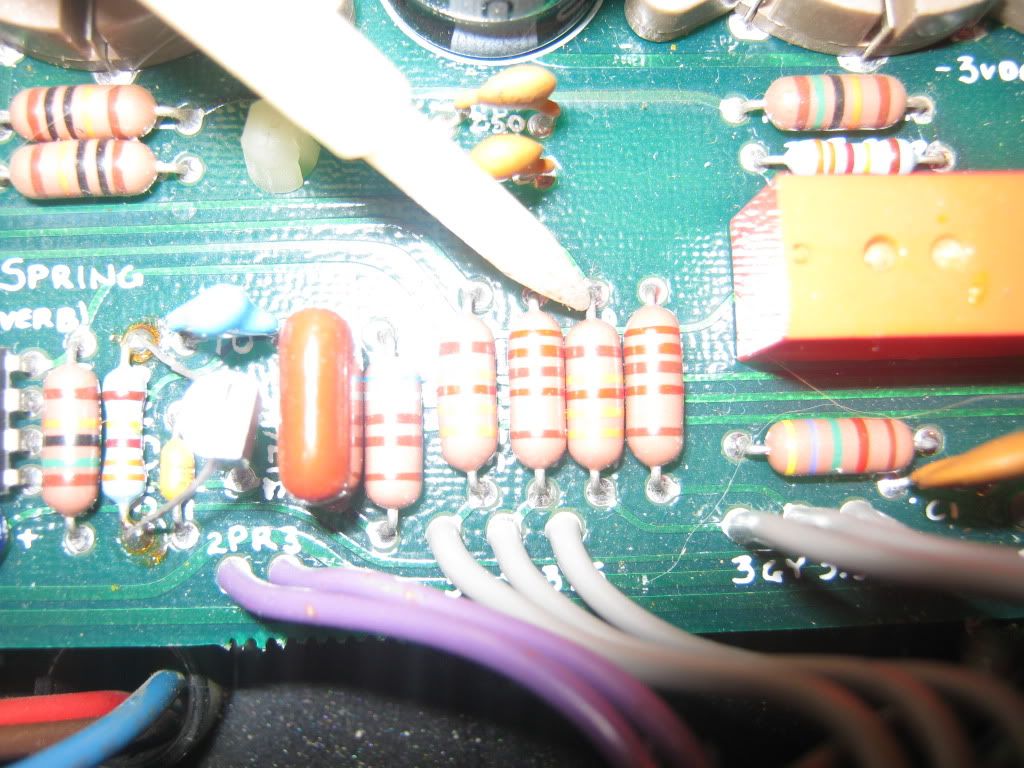
Reverb picture after mod:
Well, I haven't tried the mud mod because I don't think my amp is muddy and I have the switchable graphic eg to compensate for it. I guess my ear just likes dark sounding amps. I don't use the effects loop so I did not do the series loop mod.
I hope this helps somebody and I know there is more than one way to skin a cat. I'm satisfied with my Nomad. Happy modding!
- Pat.
Bias section before mod:

Power section before mod:

Bias section after mod:

Power section after mod:

What I was going for was a way to adjust the bias without removing the feature of being able to switch between 6L6 or EL34 and this is why I selected to remove the 56K resistor and replace it with a 33k safety resistor and a 50K pot. Some quick calulations told me this would meet the sweet spot of most output tubes. The 1 ohm, 1 watt, 1% resistor installed between the 6L6 cathodes and ground is a way for me to measure the amount of cathode current flowing though all four tubes. I just plug my voltmeter across the resistor and mV = mA. This is the same priciple many bias probes use except they usually measure one tube at a time. I was thinking about using a 1 ohm. 2W, 5% resistor for a safety factor, but, after testing, the max dissapation of the resistor will never get above .5 watts and I like the presision of 1%. I mean, if the resistor does burn at 1 watt, which would mean the amp would be trying to pump out 400+ watts, I hope it would burn up and save my output transformer!
Now some pictures:
56K resistor removed and the 33k safety resistor installed and shink wrapped:

Purple ground jumper removed and the black jumpers installed to the 1 ohm resistor:

Internal shot of the bias pot and test points:

Internal close-up of the bias pot and 1 ohm resistor. Notice how I jumpered the wiper of the pot to the unused pole. I did this in case the wiper fails and tries to nuke the amp. The pot is wired so that fully CCW that cathode current is at minimum and fully CW the cathode current is maximum:

External bias pot and test points. I know a military grade locking pot would be better, but, I did saw off the shaft to keep it from getting bumped:

Plate voltage = 442V:

Bias voltage = -41.4V. Quite a difference from the fixed -50V:

Cathode current x4 6L6 = 150.5mA (shown in mV):

OK. Some calculations: P idle = 442V x 150.5mA = 66.5 watts. I'm in the ballpark - could be a little hotter. You would like to get to 70% plate dissapation for class AB push-pull.
The cool thing here is I can replace my output tubes and bias the amp, with a voltmeter and a screw driver, without even taking the back cover off.
Now - I seen some late discussion on reverb mods. The most chatter I've heard is that the reverb is heard on channel one but is nearly non existant on channels two and three and I agree with this complaint. I could see if you start tinkering around with the 475k resistor or the 500pF cap could cause distortion while using channel one with reverb. I may try to raise the cap's value later. The next logical choice would be to bump up the signal coming back out of the reverb. I can't take credit for this mod as I have seen it here before, but sadly, the link has been removed so I'm posting my version of it here. Disclaimer - you will probably never get the reverb from your Nomad to sound like a Fender Twin without serious $ and time.
Reverb circuit before mod:

Reverb circuit after mod:

The two 330K resistor are throttling the signal back into the mix so I paralleled two 220K resistors across them lowering the resistance to 130K. The result was that the reverb was just as present in channels two and three as channel one.
Reverb picture before mod. The two 330K resistors are near the gray leads coming from the reverb pots:

Reverb picture after mod:

Well, I haven't tried the mud mod because I don't think my amp is muddy and I have the switchable graphic eg to compensate for it. I guess my ear just likes dark sounding amps. I don't use the effects loop so I did not do the series loop mod.
I hope this helps somebody and I know there is more than one way to skin a cat. I'm satisfied with my Nomad. Happy modding!
- Pat.
thelastleroy
Well-known member
- Joined
- Mar 26, 2009
- Messages
- 46
- Reaction score
- 0
@shytfayse:
Thanks for posting the bias mod tutorial, been looking for a good walk-through on this... I will do it when I have the time, although I'm not sure if I'll need any adjustments to values for EL84 bias on my Nomad 45.
For the reverb mod you outlined, Would you suggest I reverse the cap swap and resistor double up I've done previously? I get some pretty nasty distortion when the gain on the clean channel is anywhere above 9:00, which sucks because the clean channel really sounds great with the gain up. Your solution sounds more elegant.
Hello thelastleroy.
My bias problem started when I was pressured by my friend to buy tubes from him - you know, support your local businesses, buddies and all. Those JJ's were so cold that they were definately into crossover distortion. The only saving grace is that most of Mesa's tone comes from the pre-amp section. So the cold tubes were not that noticable in my amp to everbody else. Mesa runs their power section so cold and clean that you need to ram the amp up to 6+ before any kind of power amp distortion occurs. You have the extreme switch which will definately get the output cooking quicker. After I did the mod - wow - harmonically rich tone instead of cold and sterile.
If you buy tubes from Mesa you are golden. I just don't like the Chinese crap they are pushing right now. If you buy tubes from Doug's Tubes, The Tube Store or Eurotubes and tell them you have a Mesa Nomad 45 they will set you up with tubes that are within Mesa's window of operation. Alas, the pitfalls of fixed grid bias.
You've got an EL84 amp so your bias mod would look something like this:
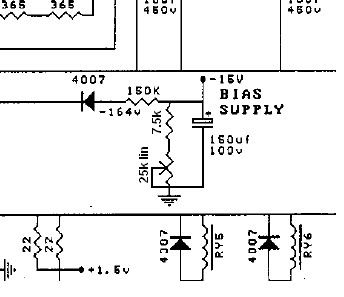
If you wanted to try the 1 ohm cathode resistor on the power tubes, the procedure would be similar to the one I've shown. 1) Find the gound jumper to the power tube section. 2) Remove it. 3) Insert the 1 ohm resistor where the jumper was.
If you look at the schematic for the Nomad, the channel one send and return circuits contain nothing to knock down the signal while the channel 2 & 3 sends contain a 120K series resistor on the input and return contains the 330K series resistor. Both of the resistors beat the signal way down while using reverb on channels 2 & 3. I've never stuck an o-scope on it, but somebody at Mesa must have thought the signal swing was too large at this point. Some people don't like the ringing/twanging sound when a high gain distored signal hits the reverb. To my ears, you could barely tell the reverb was even on channels 2 & 3. You can see if you increase the gain of the reverb input buffer where channel one would try to hammer the reverb into distortion while channel 2 & 3 sounds good. I would leave the .02 orange drop, remove the 330K across the 475K and use the mod I've shown. If the distortion persists, especially when bassy notes are hit, lower the value of the cap until you like it.
- Pat
My bias problem started when I was pressured by my friend to buy tubes from him - you know, support your local businesses, buddies and all. Those JJ's were so cold that they were definately into crossover distortion. The only saving grace is that most of Mesa's tone comes from the pre-amp section. So the cold tubes were not that noticable in my amp to everbody else. Mesa runs their power section so cold and clean that you need to ram the amp up to 6+ before any kind of power amp distortion occurs. You have the extreme switch which will definately get the output cooking quicker. After I did the mod - wow - harmonically rich tone instead of cold and sterile.
If you buy tubes from Mesa you are golden. I just don't like the Chinese crap they are pushing right now. If you buy tubes from Doug's Tubes, The Tube Store or Eurotubes and tell them you have a Mesa Nomad 45 they will set you up with tubes that are within Mesa's window of operation. Alas, the pitfalls of fixed grid bias.
You've got an EL84 amp so your bias mod would look something like this:

If you wanted to try the 1 ohm cathode resistor on the power tubes, the procedure would be similar to the one I've shown. 1) Find the gound jumper to the power tube section. 2) Remove it. 3) Insert the 1 ohm resistor where the jumper was.
If you look at the schematic for the Nomad, the channel one send and return circuits contain nothing to knock down the signal while the channel 2 & 3 sends contain a 120K series resistor on the input and return contains the 330K series resistor. Both of the resistors beat the signal way down while using reverb on channels 2 & 3. I've never stuck an o-scope on it, but somebody at Mesa must have thought the signal swing was too large at this point. Some people don't like the ringing/twanging sound when a high gain distored signal hits the reverb. To my ears, you could barely tell the reverb was even on channels 2 & 3. You can see if you increase the gain of the reverb input buffer where channel one would try to hammer the reverb into distortion while channel 2 & 3 sounds good. I would leave the .02 orange drop, remove the 330K across the 475K and use the mod I've shown. If the distortion persists, especially when bassy notes are hit, lower the value of the cap until you like it.
- Pat
thelastleroy
Well-known member
- Joined
- Mar 26, 2009
- Messages
- 46
- Reaction score
- 0
@shytfayse:
I doubled up those resistors tonight, and restored the rest of the reverb circuit to original spec. The reverb on channels 2&3 is acceptable now, but channel 1 still gets into the nasty distortion with gain at or above 12o'clock and the reverb dialed up. I'm thinking this has always happened, and was the reason I never used the spring reverb to start with.
Is there any way to attenuate the clean channel signal slightly before it goes into the tank?
By the way my name is Pat too. ;0
I'll have to test this out myself as I normally run channel one very clean - gain low @ 9 and master high @ 2. A couple of questions for you are - Do you run channel one pushed? Do you have the 500pF cap in before the reverb driver? Because I don't have a Nomad 45, I'm not sure I can tell you what to do about it. I'll look at the pics in this thread. One easy thing to try is putting a 5751 (best choice), 12AU7 or a 12AY7 tube in V2. That should lower the gain by 30% in the stage that is right before the reverb tap, but, there may be some down side if you like the overdriven sound of channel one.
- Pat.
- Pat.
thelastleroy
Well-known member
- Joined
- Mar 26, 2009
- Messages
- 46
- Reaction score
- 0
Pat,
No, I run the clean channel normal (not pushed) and I did re-install the 500pF cap. I run the gain (Ideally for me) at about 1 O'clock. I'll have to look into those alternate tube choices.
No, I run the clean channel normal (not pushed) and I did re-install the 500pF cap. I run the gain (Ideally for me) at about 1 O'clock. I'll have to look into those alternate tube choices.
Another thought on distortion on the reverb:
There are a pair of 1N4007 rectifier diodes in anti-parallel strapped to the input of the opamp stage that drives the reverb. You see the same setup in dirt pedals, granted typically *after* an opamp stage, as a guitar signal is typically too weak otherwise. I suspect they're they're to act as limiters to prevent the opamp itself from being overdriven, which probably sounds worse than a pair of clipper diodes.
If I'm understanding the rest of the circuit correctly, the opamp stage is configured for a gain of 10, and has power rails of +/-15V, which theoretically means the output signal of the op amp could swing 30V peak-to-peak before running out of power from the power supply and clipping. At a gain of 10, that means an input signal of any greater than 3V peak-to-peak would overdrive the opamp. However, in all the simulations I've run of opamp amplifier circuits, the opamp cannot take the output signal all the way to the power rails - it always clips a little bit before. So then lets give ourselves 20% headroom, and try to avoid feeding the opamp a signal it would try to take past 24V peak-to-peak. With a gain of ten, that limits us to an input signal of 2.4Vpp. Those diodes limit the input signal from going higher than 1.4Vpp.
So if we are clipping the diodes we could increase the number of diodes or replace them with diodes with higher forward voltages. Unfortunately more silicon diodes means working in multiples of .7V. We could add two more 1N4007s, but that means now peak input voltage can reach 2.8Vpp. At a gain of 10, output voltage would be 28Vpp, almost 95% of the power supply voltage, putting the opamp pretty close to clipping if it isn't clipping already. A red LED wouldn't work either for the same reason. 1.6V on each red diode would mean the opamp could see as hot as 3.2Vpp signal on it's input, definitely enough to overdrive it.
1N4007s are rectifier diodes. They're intended for use in power supplies, and as such are intended to withstand high voltage and high current without melting. Assuming those 1N4007s *are* there as limiters to prevent the opamp from being overdriven, I wonder why the limiters need to be able to handle 1000V of reverse voltage. Assuming that the 1N4007s were selected for tonal reasons, then perhaps some germanium diodes could be used here, which have about a .3V forward voltage. If 3 germanium diodes were put in series each way, that would allow 1.8Vpp before the diodes clipped, hopefully giving channel 1 enough headroom to not be clipped by the diodes, but still not driving the opamp so hard as to clip it.
thelastleroy
Well-known member
- Joined
- Mar 26, 2009
- Messages
- 46
- Reaction score
- 0
Uh, my brain just exploded, but Koreth I do believe you have found the culprit. It does to me sound like a bad distortion pedal playing faintly in the background when I set the reverb/gain to extreme settings, and disappears entirely as I roll off the reverb control.
It really sucks that we have to re-engineer something to work properly that was released as a tested, finished product. Why put a beautiful long-box three spring tank in the amp and drive it with a flawed circuit? I'm dreading the idea of buying 6 germanium diodes (if they as rare, expensive and thermally sensitive as their transistor cousins). What info do I need to source the appropriate diodes? (ratings, tolerances etc)
Note to prospective Nomad buyers: Prepare to compromise on the reverb, buy a good pedal (any suggestions??? , or mod the amp to work properly.
Hopefully we can get to the bottom of this,
Thanks for all your help guys, much appreciated.
It really sucks that we have to re-engineer something to work properly that was released as a tested, finished product. Why put a beautiful long-box three spring tank in the amp and drive it with a flawed circuit? I'm dreading the idea of buying 6 germanium diodes (if they as rare, expensive and thermally sensitive as their transistor cousins). What info do I need to source the appropriate diodes? (ratings, tolerances etc)
Note to prospective Nomad buyers: Prepare to compromise on the reverb, buy a good pedal (any suggestions???
Hopefully we can get to the bottom of this,
Thanks for all your help guys, much appreciated.
Another thought. Keep the 1N4007s, add two more of em, and replace the 47k resistor with a 56k or 51k resistor to pull the gain of the opamp back a bit to keep the increased signal voltage in from overdriving the opamp. Probably easier than sourcing germanium diodes and would involve replacing less parts.
Well Pat...I tested my reverb on channel one with the gain up, and sure enough, I could hear some hashy, diode clipping like distortion under the note. You really got to tune your ears into the reverb signal but it is there. I guess I just havent noticed it because I run channel one with the gain very low. Are you going to try the mods Koreth suggested? - Pat.
Similar threads
- Replies
- 7
- Views
- 551
- Replies
- 70
- Views
- 11K


