EDIT: Much of what's in this first post is incorrect, despite being what I believe is an awesome mod. Thanks to msi, JCDenton6, and many others in this thread, I believe the following is 100% correct:
After everything that's been gone through, it really does seem there's only a slight difference between revisions. Most notable of C/D are the following:
1. Higher presence pot value (220k, I believe, instead of 100k) makes the entire amp brighter
2. No LDRs on the preamp cathodes means a slightly tighter, dryer tone
3. Different output transformer (which, although present on later revisions, I believe plays a role here with the aforementioned differences)
There are other changes, but as far as I can hear, that's what it takes to get C/D red modern. Because of the layout on later 2-channel revisions, there's no simple mod to get 100% accuracy.
I've been interested in the fabled "holy grail" pre-500 tone for years, as I'm sure most are. Through MANY hours of research and testing, I believe I've finally cracked the circuitry code and have found that by swapping TWO parts, your Rev. G Rectifier can have pre-500 tone. Why am I sharing my countless hours of hard work? Because for one, the two parts will take a skilled tech about 5 minutes to swap (and maybe 20 for an unskilled one) and come to a total cost of about $10, not at all warranting the huge amount of money the real pre-500s command. Two, because HOLY HELL it sounds amazing!
So what exactly is the difference in sound? Less flub, bigger midrange, and much more usable gain. At 11:00, the gain is about as much as you'd get from a Rev. G at 2:30 - 3:00. And when you do bring the gain to 3:00 for a huge amount of saturation, it stays tight! What's the drawback? Well, cleans suck again. And the thing is, the stock tone is still awesome. Yes, everything I just said is true, but at low gain settings, the stock setup will be a bit thicker (albeit not nearly as tight). Still, there's no harm in trying this setup, and I highly recommend taking the $10 and ~15 mins and trying it!
Before I get to the mod, here are some clips to show the difference. Please note that I am NOT an expert on recording techniques. These clips are meant to show the difference between the two setups, all else kept the same (except gain settings). No EQ except for a slight high pass filter
Stock
"Pre-500" tone
5150 (for perspective)
I used a Rectifier 4x12, MD421 close, and Studio Projects B1 for the room. Guitar is a Gibson R9 with a BKP Abraxas. Using an Mbox for mic preamps. Settings are as follows:
Treble and Bass: noon
Mids: 12:30
Presence: 8:00
Gain: 1:30 stock, 10:30 on the "Pre-500" (though in retrospect, I'd bring it up a bit in the chorus and down a hair in the verse)
Master: 10:30
The differences are a little more noticeable in the room, but I think they show well enough. Might have had the volume just a little too high.
On to the mod!
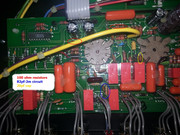
1. Change the gain pots to 1MA. Make sure you swap the cap that jumps the two lugs to the new pot.
2. Swap this capacitor to one valued at .005uF, with a voltage rating of at least 450. (0.0047uF Orange Drop is perfect)
This should do it! Of course, changing the Red presence control to a 26k linear would be closer still, but the stock 100k gets you the same sound (just has more presence past 9:00).
If anyone else decides to try this, please share your findings! As for me? I like the Rev. G circuit very much, and would like to have both setups. However, in almost every case, I'd take this Pre500 configuration.
I think that covers everything, though please let me know if I've missed something!