Since my recently purchased MKIIB didn't come with a channel changing footswitch, I decided to build one up from some extra parts that I had. I'm posting the info here for anyone else who wants to make their own. This pedal should work on any amp which uses the simple on - off switching scheme. I haven't tried it, but it may also work in the EQ and reverb positions. If it does, you can get a bigger box and put all three in the same box, or have 3 different boxes.
The channel change pedal is really simple. I used parts that I had on hand. I reference Radio Shack part numbers in the photo's, if you want to run down to your local RS and pick them up. You just need the following:
1. Enclosure - I used a plastic Radio Shack project box, but if you have a tendency to crush things, you might want to get a steel or aluminum enclosure. Due to the small size, my plastic box is pretty sturdy. I've seen guys build pedals in tuna cans, breath mint tins, there's even a picture going around of a guy that built his effect pedal in a hollowed out half of a coconut shell.
2. Mono 1/4" jack - Nothing fancy. Two connections - Tip of the cable and Sleeve of the cable.
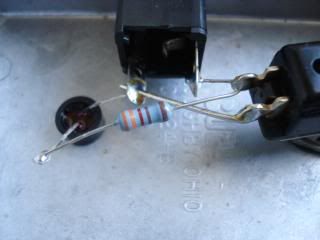
3. Any Color LED with Holder - You don't even need the LED. The pedal works just the same without it, but I like being able to see whether I'm on the Rhythm or Lead Channel. Of course, I can usually tell this without the LED. FYI: LED's have two wires coming out of them. One wire is longer than the other. This is the + wire which connects to the tip of the jack. The shorter wire is the - connection which connects to the sleeve of the jack.
4. 4.7K resistor. This just sets the brightness of the LED. Without it, the LED might be too bright, or even burn out. You can probably try different value resistors, to get a brightness that you're comfortable with. Fortunately, Boogie designed their amps to send a little power out the footswitch jack. Just enough to light up the LED. Otherwise, you would need to use a battery or power supply in your footswitch to get the LED to light up.
5. Finally, the footswitch. The footswitch that I used is really overkill, but it's what I had on hand. It's a 3 Pole Double throw or (3PDT) footswitch. Meaning that it has 3 rows of poles and 2 positions for each row. For this pedal to work, you only need a Single pole Single throw or (SPST) footswitch. If you notice in the picture, I'm only using 2 of the connections on the switch. The Radio Shack footswitch that I referenced in the photos will work fine, if you don't stomp too hard. If you want a more robust build, find yourself a more sturdy footswitch. The footswitch that I used can be found on Ebay for 4 or 5 dollars. Cheaper if you buy in bulk.
Oh...You'll also need some stranded wire, and of course the tools necessary to drill holes in the enclosure and to solder this puppy up.
This switching design has two states open or closed. You can get the same effect by plugging a guitar cord into your footswitch jack on your amp, then using a short wire to touch the tip and sleeve together on the other end. Your just completing the circuit with this footswitch.
In a nutshell, you connect the + side or tip of the 1/4 jack to the + side or longer LED leg then connect them both to one side of the footswitch. Doesn't matter which side.
On the - side or shorter leg of the LED, you connect the resistor first. Doesn't matter which side of the resistor, it's not directional, then connect the other side of the the resistor to the - side or sleeve side of the 1/4 jack. You then connect them both to the unused side of the footswitch.
It's really much easier to look at the pics. Here ya go:


The channel change pedal is really simple. I used parts that I had on hand. I reference Radio Shack part numbers in the photo's, if you want to run down to your local RS and pick them up. You just need the following:
1. Enclosure - I used a plastic Radio Shack project box, but if you have a tendency to crush things, you might want to get a steel or aluminum enclosure. Due to the small size, my plastic box is pretty sturdy. I've seen guys build pedals in tuna cans, breath mint tins, there's even a picture going around of a guy that built his effect pedal in a hollowed out half of a coconut shell.
2. Mono 1/4" jack - Nothing fancy. Two connections - Tip of the cable and Sleeve of the cable.
3. Any Color LED with Holder - You don't even need the LED. The pedal works just the same without it, but I like being able to see whether I'm on the Rhythm or Lead Channel. Of course, I can usually tell this without the LED. FYI: LED's have two wires coming out of them. One wire is longer than the other. This is the + wire which connects to the tip of the jack. The shorter wire is the - connection which connects to the sleeve of the jack.
4. 4.7K resistor. This just sets the brightness of the LED. Without it, the LED might be too bright, or even burn out. You can probably try different value resistors, to get a brightness that you're comfortable with. Fortunately, Boogie designed their amps to send a little power out the footswitch jack. Just enough to light up the LED. Otherwise, you would need to use a battery or power supply in your footswitch to get the LED to light up.
5. Finally, the footswitch. The footswitch that I used is really overkill, but it's what I had on hand. It's a 3 Pole Double throw or (3PDT) footswitch. Meaning that it has 3 rows of poles and 2 positions for each row. For this pedal to work, you only need a Single pole Single throw or (SPST) footswitch. If you notice in the picture, I'm only using 2 of the connections on the switch. The Radio Shack footswitch that I referenced in the photos will work fine, if you don't stomp too hard. If you want a more robust build, find yourself a more sturdy footswitch. The footswitch that I used can be found on Ebay for 4 or 5 dollars. Cheaper if you buy in bulk.
Oh...You'll also need some stranded wire, and of course the tools necessary to drill holes in the enclosure and to solder this puppy up.
This switching design has two states open or closed. You can get the same effect by plugging a guitar cord into your footswitch jack on your amp, then using a short wire to touch the tip and sleeve together on the other end. Your just completing the circuit with this footswitch.
In a nutshell, you connect the + side or tip of the 1/4 jack to the + side or longer LED leg then connect them both to one side of the footswitch. Doesn't matter which side.
On the - side or shorter leg of the LED, you connect the resistor first. Doesn't matter which side of the resistor, it's not directional, then connect the other side of the the resistor to the - side or sleeve side of the 1/4 jack. You then connect them both to the unused side of the footswitch.
It's really much easier to look at the pics. Here ya go: