Mk I chassis mounting - help needed!

The Boogie Board

Help Support The Boogie Board:

This site may earn a commission from merchant affiliate links, including eBay, Amazon, and others.

shakti

Member
Joined
Jan 24, 2007
Messages
6
Reaction score
0
I have a '76 original Boogie Mk I which I want to mount in a newer Mesa hardwood cab, which used to house a Mk I reissue.

However, the mounting holes on the newer reissues are closer together (wider chassis flanges) than on the old ones. I don't want to drill the beautiful hardwood cab for new holes, so I have to come up with a different solution.

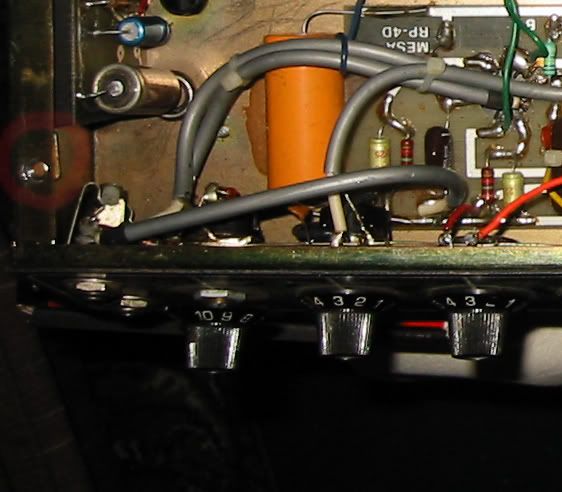
To do that I need, among other things, mounting nuts for the original mounting screws used on the reissue amp. As you can see in the photo below of the '76 amp, there are some pre-drilled nuts that have been inserted below the chassis flange with the actual nut sticking through a hole in the chassis flange. What I need is four of those "bits" that you can see in the photo. Am I making sense here? The problem is, I have no idea what they are called, so I don't even know where to begin to search... Can anyone help?

chassisflange.jpg
 
Hey,

This won't work. The old space mounting and the new space mounting started with the IIB amps is so close that you need to either modify the chassis edge or drill new holes. I went with the former as MESA filled the holes for me.

The washers that you are looking for MESA no longer uses. You could drill four new holes if the don't hit anything and use the old long screws.

BWK
 
Are you sure about this? When I measured, it seemed like the reissue amp mounting screws (which I plan to use), *just* miss the chassis flange of this original Mk I. So what I am planning to do, is to attach some steel extension from under the flange, and drill new holes in that. Seems to me it should work, as long as the screws don't touch the flange? But I don't have the amp in front of me for measurement.

As for the washers, Mesa definitely used similar washers on my reissue amp (now sold), but it's a different nut size - the mounting screws on the original amp are thicker than on the reissue. But I want to use the reissue mounting screws because the black oval head screws look really nice with the decorative black washers on the hardwood cabs.

Another alternative would be to use the larger mounting cups that I see on some amps. Anyone know what I am talking about? I am thinking that would give me a bit more leverage for matching the mounting holes on the chassis. The only problem I see with that, is that if I want to drill the reissue hardwood cab for these larger cups, they would come very close to the edges of the cab... Anyone tried this? Anyone know where I can get a set of those mounting cups?
 
shakti said:
Are you sure about this? When I measured, it seemed like the reissue amp mounting screws (which I plan to use), *just* miss the chassis flange of this original Mk I. So what I am planning to do, is to attach some steel extension from under the flange, and drill new holes in that. Seems to me it should work, as long as the screws don't touch the flange? But I don't have the amp in front of me for measurement.

As for the washers, Mesa definitely used similar washers on my reissue amp (now sold), but it's a different nut size - the mounting screws on the original amp are thicker than on the reissue. But I want to use the reissue mounting screws because the black oval head screws look really nice with the decorative black washers on the hardwood cabs.

Another alternative would be to use the larger mounting cups that I see on some amps. Anyone know what I am talking about? I am thinking that would give me a bit more leverage for matching the mounting holes on the chassis. The only problem I see with that, is that if I want to drill the reissue hardwood cab for these larger cups, they would come very close to the edges of the cab... Anyone tried this? Anyone know where I can get a set of those mounting cups?

With the fact that he has not only attempted to do what you are trying, it already answered your question. I dont think Mesa has screws for an amp DC's 28 some odd years ago.

Those mounting cups are called SUS-4 mounts and are proprietary to Mesa. The cup is just a vanity cover and the shock mount needs to be placed under the chassis with four set screws.

At any rate, I think your pissing up a rope with either idea. Maybe a solution will present itself when you actually have everything in front of you.
 
Boogiebabies said:
At any rate, I think your pissing up a rope with either idea. Maybe a solution will present itself when you actually have everything in front of you.


I have pissed on this rope, and decided that the adapter plate is more trouble than it's worth. There will be interference between the bolt head of one screw and the threads of the other if you try to mount the adapter plate using the threaded inserts shown in the photo. The funny thing is that I work in the machining industry (I have the access to materials and precision metal cutting equipment), and have a hard-on for hardwood. :lol: The easiest way to relocate the mounting holes will be to cut out the existing inserts and the small piece of chassis inboard of them. Then use some metal grade epoxy to fasten a wider piece of sheetmetal to the chassis. Then you can drill and tap your new mounting holes in the proper location.The last really nice wide spaced hardwood/wicker Boogie combo cab (no chassis) that I saw went for over $900 on Ebay. There is a good reason why. FWIW, I chose to leave my amp in its black tolex head.
 
Well, I decided to take this on despite all the naysayers here, and guess what?

The amp now resides securely inside the hardwood cabinet, with no drilling of either the cab or the chassis. I made adapter plates which were mounted through the original chassis holes, 100% reversible yet 100% secure. It wasn't even very difficult to do once I got the right parts together, so so much for pissing up a rope.

I'll post some photos soon.
 
Man, that is great. I was revisiting this idea yesterday when I put my hardwood combo cab and MkI up for sale. I did some more measuring, and realized that it can be done much easier than I first had thought. Did you pull out the 10-24 inserts and use the thru hole in the chassis? With the adapter plate having two sets of threaded holes? If my stuff doesn't sell, I will be doing this very same thing. :D Show us the pics, please.
 
My friend got some photos on his cell phone camera, so I'll have to get them from him first.

I used the black plated screws that were originally used on my RI amp in the hardwood cab. These are 8-32, whereas my '76 used 10-24 (I think - they are definitely thicker though).

What I did was the following:

1) I used a 2mm thick steel plate to make small (approximately 2 x 2.5 cm) extension plates that protrude from under the chassis flange.

2) In these plates, I had to drill 4 holes: the first one to line up with the original chassis cutout, then one which was exactly 8.5 mm inside of that, for the new mounting hole, and lastly two small ones on either side of that for riveting in these nutplates:
http://cgi.ebay.com/ebaymotors/ws/eBayISAPI.dll?ViewItem&sspagename=STRK%3AMEBTOX%3AIT&viewitem=&item=330184941549&_trksid=p3984.cTODAY.m238.lVI

3) I had to grind down the last bit of those nuts since they were self-locking, so the mounting screw will insert all the way through the nut.

4) I used rivets to attach the nut plates on the underside of the extension piece. Those nutplates are floating, so they have a little bit of built-in "slack", which makes it very easy for the mounting screw to enter.

5) Lastly, I attached the extension adapter pieces on the underside of the chassis flange and inserted a short screw from the underside. I used a 4mm metric machine screw. This was the trickiest bit - had I used a 3mm it would have been very easy as that would have passed through the original #10-24 nut in the chassis with ease, whereas the 4mm had to actually be screwed in from the underside! Very tricky - but I solved this by cutting a small slot in the end of the screw shaft, and use that as a pseudo slot head and basically screw it backwards through the nut inserts. Fortunately the metric 4mm screw threads match rather nicely with the 10-24 nut inserts. Then I used a thin hex nut to secure those 4mm screws where the protrude through the chassis. I was lucky that the screw length was short enough that I didn't have to cut it down, but that would have been easy to do.

This will all make much more sense when I show the photos, but believe me, it works like a dream! The only bummer was that the new mounting nut is probably 4-5mm lower than the original one, so the original 8-32 1" mounting screws are now too short! D'oh! I am trying to find some that are slightly longer. I managed to secure it for now by leaving out the decorative washers on the outside of the cab, which made them *just* long enough to hold the chassis, but it's not ideal since the screw heads are now resting directly onto the wood.
 
My hardwood cab is the SUS mount type. It may require a slightly different approach to mounting the adapter plate onto the chassis. The attachment depth needs to be close to the same height as the original chassis, so that it can still "float" as was originally intended. :D
 

Latest posts

Back
Top