You are using an out of date browser. It may not display this or other websites correctly.
You should upgrade or use an alternative browser.
You should upgrade or use an alternative browser.
anyone got DIY thiele cab pics? plans?
- Thread starter sharkinabus
- Start date


Help Support The Boogie Board:
This site may earn a commission from merchant affiliate
links, including eBay, Amazon, and others.
YellowJacket
Well-known member
thunda1216 said:some speakers (like the Eminence Governor) come with gaskets on both sides of the basket...
ty
Celestions only have a gasket on the front of the basket. BOO URNS!!! I guess I'll have to find / buy something for that then =-(
I could try to load the speakers from the rear but the plans are for a front mounting baffle and I'd imagine there is not room for the speaker to mount from the back side. **** =-(
GD_NC
Well-known member
I'm thinking about building one of these from the EV TL-806 plans. I have two quick questions.
#1 - The size of this EV cab is somewhat smaller than the Boogie compact version. To correct this, I plan to insert an extra "wall" of 3/4 plywood on the ports side to extend the overall length (effectively using a double wall on the ported side). To make this work, I plan to cut the extra inside wall so it will hide behind the baffle and back. I'll need to extend the length of the top, bottom and back by 3/4" to accommodate. This should maintain correct airspace and all the inside dimensions to keep tuning intact while increasing the length to match a standard Boogie combo. Anybody tried this? Any other way to build this to Boogie width w/o modifying the engineering?
#2 - Can someone post an inside picture of a baffle they have made for this cab ? I'm not exactly sure how to cut that part.
Sounds like you want to do exactly what I did. I extended it in one dimension to match the width of the head, and changed the depth accordingly to keep the internal volume the same. If you don't want to mess with calculators, why not just add an extra thickness of 3/4" wood to the sides that require it? (On the outside, of course, so as not to change the internal dimensions.)
YellowJacket
Well-known member
GD_NC said:I'm thinking about building one of these from the EV TL-806 plans. I have two quick questions.
#1 - The size of this EV cab is somewhat smaller than the Boogie compact version. To correct this, I plan to insert an extra "wall" of 3/4 plywood on the ports side to extend the overall length (effectively using a double wall on the ported side). To make this work, I plan to cut the extra inside wall so it will hide behind the baffle and back. I'll need to extend the length of the top, bottom and back by 3/4" to accommodate. This should maintain correct airspace and all the inside dimensions to keep tuning intact while increasing the length to match a standard Boogie combo. Anybody tried this? Any other way to build this to Boogie width w/o modifying the engineering?
#2 - Can someone post an inside picture of a baffle they have made for this cab ? I'm not exactly sure how to cut that part.
re#2 - We'll be cutting the baffle tomorrow. What do you mean by 'inside?? Do you want a picture from the back part of the baffle, the wall that faces inside the cab? The speakers are front mounting so it is a VERY compact design. We are going to cut the hole based on the dimension of the angled part of the speaker baskets.

(this is the wood here with the speakers resting on it)
If you are interested, I have lots of the build pics in this thread here: http://forum.grailtone.com/viewtopic.php?f=14&t=37817
GD_NC
Well-known member
Thanks Yellowjacket! I've been following your build. You've done a fantastic job.
Now that I look at my question, I realize I didn't ask it correctly. What I'm looking for is a picture of the baffle cover. (The piece that hold the grill cloth.) Seems you have to keep it pretty thin but I don't want it to rattle.
Now that I look at my question, I realize I didn't ask it correctly. What I'm looking for is a picture of the baffle cover. (The piece that hold the grill cloth.) Seems you have to keep it pretty thin but I don't want it to rattle.
YellowJacket
Well-known member
gts said:Use 3/4" ply for the cover.GD_NC said:Now that I look at my question, I realize I didn't ask it correctly. What I'm looking for is a picture of the baffle cover. (The piece that hold the grill cloth.) Seems you have to keep it pretty thin but I don't want it to rattle.
I'm curious how to mount the cover without putting screws through my grille cloth. We're definitely going to use 3/4" ply for the frame and I'm going to put piping on the outside. It is definitely going to be interesting to get this all to fit and look right.
YellowJacket
Well-known member
We decided to use velcro, 5/8th inch plywood (it was available) and blocks to secure the grille. That really was sufficient. The 2 x 12 is built like a tank and it weights a tonne!!

Wooden Frame
I couldn't take a photo of installing the grille cloth because my hands were needed to help with that. We stapled the top on, then we did the bottom, then left and right. It was wrapped over the frame and stapled on the back of it.

Piping

Here you can see the back of the frame and the staple job.


Blocks

Velcro
. . . . . . .
. . . . . . .
. . . . . . .
*sorry, you have to see my build thread for the finished product. I'll post the pics in a few hours!
-YJ
Wooden Frame
I couldn't take a photo of installing the grille cloth because my hands were needed to help with that. We stapled the top on, then we did the bottom, then left and right. It was wrapped over the frame and stapled on the back of it.
Piping
Here you can see the back of the frame and the staple job.
Blocks
Velcro
. . . . . . .
. . . . . . .
. . . . . . .
*sorry, you have to see my build thread for the finished product. I'll post the pics in a few hours!
-YJ
GD_NC
Well-known member
WOW! That's a great cab. And thanks for the additional pics of the grill cover.
YellowJacket
Well-known member
GD_NC, I should mention that a dummy wall on the port side of the cab can also dub as an anchor point for your grille frame. This will ensure that the cover isn't obscuring the port in any way. (this was a problem I ran into during my build)
And here is the final product!
*drumroll*

Once again, a very detailed chronicle of the project is available over in my project thread. I couldn't find anything quite like that when I searched the net so I'm hoping this will help others out who want to attempt the same thing.
Some things I learned while working with a carpenter.
1) build from the inside out.
2) adjust the plans as necessary. Nothing ever works out perfectly. (human error and all that)
3) Innovate. Cork makes a great gasket. Hey, if Celestion used to use it in the 1960s, it is bound to work.
4) Glue, nail, screw. Fast, solid, and EFFECTIVE!!!
5) Definitely get top grade wood and components. Don't skimp on anything. I did this and it was definitely worth it.
6) Always get a bit more than you think you'll need. You never know when you'll run out due to circumstances or human error.
7) Overkill is the proper approach to cab building. Silicon to seal the baffle, weather stripping to create a tight fit for the back panel, cork gasket for speakers, velcro anchor points for the grill and piping to provide a snug and vibration free fit.
8) Read up and KNOW what you're doing. I learned so much from this thread studying the wisdom of Boogafunk in particular as well as the others who have had some time with this.
Well, I hope to see many more new Theiles showing up in this thread!!
And here is the final product!
*drumroll*
Once again, a very detailed chronicle of the project is available over in my project thread. I couldn't find anything quite like that when I searched the net so I'm hoping this will help others out who want to attempt the same thing.
Some things I learned while working with a carpenter.
1) build from the inside out.
2) adjust the plans as necessary. Nothing ever works out perfectly. (human error and all that)
3) Innovate. Cork makes a great gasket. Hey, if Celestion used to use it in the 1960s, it is bound to work.
4) Glue, nail, screw. Fast, solid, and EFFECTIVE!!!
5) Definitely get top grade wood and components. Don't skimp on anything. I did this and it was definitely worth it.
6) Always get a bit more than you think you'll need. You never know when you'll run out due to circumstances or human error.
7) Overkill is the proper approach to cab building. Silicon to seal the baffle, weather stripping to create a tight fit for the back panel, cork gasket for speakers, velcro anchor points for the grill and piping to provide a snug and vibration free fit.
8) Read up and KNOW what you're doing. I learned so much from this thread studying the wisdom of Boogafunk in particular as well as the others who have had some time with this.
Well, I hope to see many more new Theiles showing up in this thread!!
GD_NC
Well-known member
Thank you for taking the time to document your build! What a great resource.
Also, a great point about keeping the grill cover from blocking the port! Another bonus of adding an extra wall.
One last question. Where did you get the cork? Was it a sheet? How thick?
I hope to take a shot at building a 1x12 Thiele later this summer when my weekends get free. Once I get started, I'll post some pictures along the way.
Any volunteers for a -Thiele 4x12?????
GD_NC
Well-known member
Agreed. Forklift required for that puppy.
I like your idea. All the sound and much more portable!
I like your idea. All the sound and much more portable!
ryjan
Well-known member
Yeah, I'll just build it into a wall in my basement. If a tornado hits us, it'll anchor the house down. http://boogafunkcabs.net/index_files/Page815.htmAny volunteers for a -Thiele 4x12?????
These guys do them though. :twisted:
YellowJacket
Well-known member
GD_NC said:Thank you for taking the time to document your build! What a great resource.
Also, a great point about keeping the grill cover from blocking the port! Another bonus of adding an extra wall.
One last question. Where did you get the cork? Was it a sheet? How thick?
I hope to take a shot at building a 1x12 Thiele later this summer when my weekends get free. Once I get started, I'll post some pictures along the way.
Any volunteers for a -Thiele 4x12?????
No way for a Thiele 4 x 12. >=-[ The 2 x 12 is backbreaking enough.
Cork . . . The father in law type person had some sitting around in his shop. Seems to me it was a sheet about 1/4 inch thick and it was just cut by hand to the outside of the speaker. I will say this, you HAVE to glue it onto the basket. If not, it will become your biggest enemy as you try to mount the speakers on the baffle.
I read about how EV said to insulate the cab. I was playing around with cloth today, trying to get an idea of what sounded best. I found that I liked the sound best only when the back panel is covered. I guess it deadens the blowback from the speaker cones without completely killing the resonance in the cab because the sound clears up nicely. I tried covering more of the inside and it started to sound fabric-y or cloth-y, and lost a lot of warmth.
Oh, just an interesting point, you can't do a 1 x 12 and 2 x 12 parallel wiring configuration with two speaker jacks. I thought my wiring made sense but I should have created a schematic because when I did, after the fact, I discovered that both of my jacks were parallel 2 x 12 configurations in 8 ohms. Always good to double check. Now I am probably going to rig each jack up to a speaker. This way I have a v30 thiele, a G12m Heritage thiele and I can just run two speaker leads for 2 x 12.
I read in my Dual rectifier manual that you can buy speaker lead splitters both in parallel and series. Has anyone seen something like this? I'm tempted to get a series one so I can run the 2 x 12 in 32ohms, which would allow me to run my head from the 16 - 8 ohm jack with two power tubes pulled.
GD_NC
Well-known member
I have wood and a plan! I think my 1x12 Thiele project is about to get started. Thanks for all the advice.
GD_NC
Well-known member
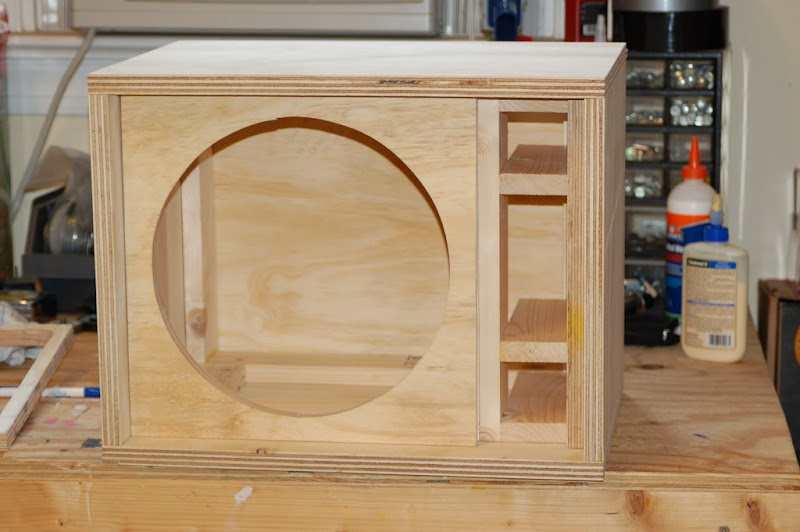
I built a Thiele cab today. I used a modified version of the EV TL-806 plan. I changed the plans slightly to make it fit under a Mark IV by adding an extra side wall under the ports. I think it came out pretty well. Still have a ways to go but I thought I'd share what I had so far.
GD_NC
Well-known member
YellowJacket said:Oh, I have a question: When mounting a speaker to the baffle from the front, is there some sort of a gasket to go between the metal basket and the wood from the baffle!?
I found a source for this gasket....
http://www.speakerworks.com/SearchResults.asp?Search=gasket
GD_NC
Well-known member
DONE!
...and WOW does that thicken up a combo's sound.

Thanks for all the help!
...and WOW does that thicken up a combo's sound.
Thanks for all the help!
YellowJacket
Well-known member
Awesome build, dude. You'd think Mesa made that cab themselves!!! Aren't the thieles brilliant??!
 (here is my thiele with the Dual perched on top where it belongs)
GD_NC said:DONE!
...and WOW does that thicken up a combo's sound.
Thanks for all the help!
Great job GD_NC!
I assume this is a pic of your new Mark IV. How did it check out with Mesa?
Similar threads
- Replies
- 9
- Views
- 11K
- Replies
- 1
- Views
- 6K
- Replies
- 10
- Views
- 5K